
Few weeks ago in our Pinay Mommy Community FB group, one of our dear mommies asked about how to make those embossed banners/badges. So in response to her, I decided to make a tutorial on sample settings on how make such in Photoshop.
1. Let us start by opening your banner in Photoshop (assuming you have an existing flat banner). I will use my own 125x125 banner for this tutorial.
1. Let us start by opening your banner in Photoshop (assuming you have an existing flat banner). I will use my own 125x125 banner for this tutorial.

2. Then duplicate it (press CTRL+J).

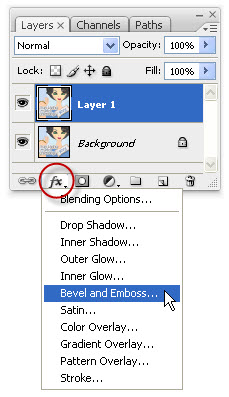
3. Click the Add a layer style button at the bottom of the Layer palette and choose Bevel and Emboss.
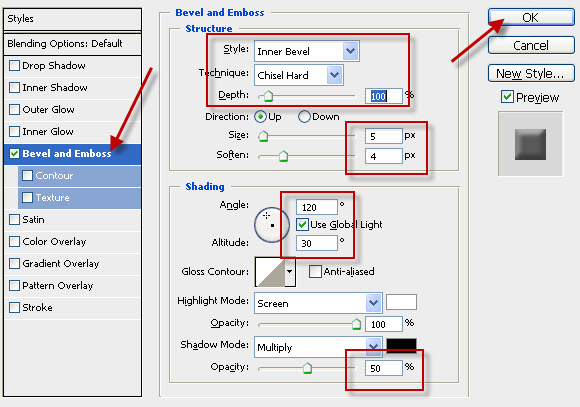
4. In Bevel and Emboss option window, do the following settings and click OK when you are done.
5. After hitting OK, here is now my badge with an emboss effect.

So simple, right. My flat banner becomes an embossed one in just few steps. To make it easier for you, here is another simple trick if you want to apply the same settings to all your badges.
Point the mouse on the layer name of the embossed badge, right click and choose Copy Layer Style from the options.
Point the mouse on the layer name of the embossed badge, right click and choose Copy Layer Style from the options.
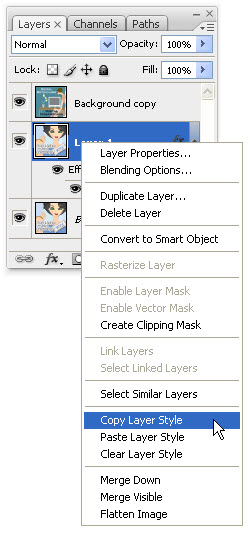
Then, open your other badge. Point the mouse on the layer name, right click and choose Paste Layer Style from the options.

Do the same thing to the rest of your badges. It could save your time if you have 3 or more banners.

The settings I gave are just sample for 125x125 badges. You are free to adjust and modify these settings according to your desire. For example, if you want more embossed badge, increase the Depth to 120% or more, or the slider options for the size and soften in the Bevel and Emboss settings. So it depends on your needs. What I have shown you is just basic steps to get you started.
By the way if you want to make a round badge, I have a separate posted tutorial on my other site. You can also download a psd file of that round badge templates for high quality printing projects and for web display.
Hope this piece of information could help you. Just get back to me anytime if you find any difficulty in following the steps. Happy badge embossing!

The settings I gave are just sample for 125x125 badges. You are free to adjust and modify these settings according to your desire. For example, if you want more embossed badge, increase the Depth to 120% or more, or the slider options for the size and soften in the Bevel and Emboss settings. So it depends on your needs. What I have shown you is just basic steps to get you started.
By the way if you want to make a round badge, I have a separate posted tutorial on my other site. You can also download a psd file of that round badge templates for high quality printing projects and for web display.

Thank you so so much Grace!! :) I sobrang appreciate the help sa mga newbie like me.
ReplyDeleteThis comment has been removed by the author.
ReplyDeleteAnong klaseng photoshop ang gamit mo,I mean,what version?I'm using PSE7, all i have to do is to click the embossed on the effect column, and that's it!.
ReplyDeleteHi Grace! how do I make a flat badge in the first place? :) I'm a newbie. thanks :)
ReplyDelete@Willa, it is done in Photoshop CS3. CS3 and Photoshop Elements sometimes have difference in settings...magkaibang software kasi sila.
ReplyDelete@All, thank you po sa pag-appreciate:)
Thanks for the tutorial. Love your blog's layout/color.
ReplyDeletehi! i just want to say thank you for the tutorial. i'm so clueless about photoshop. you're a great to us blogging newbies.
ReplyDeletecatch with you at adgitize ...:)
betteryeth.blogspot.com
thanks for posting this, i really don't know how to use photoshop + would always harass my bro if ever i need something done there..i will give this a try:)
ReplyDeletemumwrites
jared's little corner